Step 1: Search for the relevant submission as per the section above
Step 2: Click ‘Remind’
Submitting a Purchase Requisition Form
Purchase Requisitions can be submitted by either converting directly from one or more Request forms, or by direct creation at the ‘My Requisitions’ page
Direct Creation of a Purchase Requisition
For Purchase Requisition with no prior Request form, follow the steps below to create and submit the Purchase Requisition
Step 1: Under ‘Requisition’, click on ‘My Requisitions’
Note: If you are unable to access the ‘Requisition’’ module, please contact your ADAM administrator.
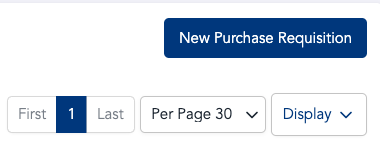
Step 2: Click ‘New Purchase Requisition’
Note: The button will show ‘Draft Requisition’ if you have a draft in progress. To create a new submission, you will need to cancel or complete the previous draft.
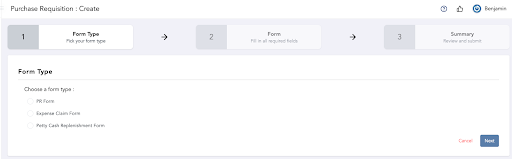
Step 3: Choose a ‘Form’
Select Form Type and click ‘Next’
Note: If you are unable to find a specific form, please contact your ADAM administrator to assign the form to you.
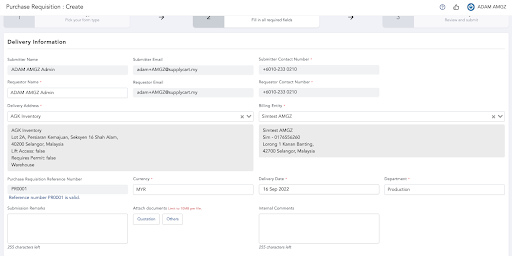
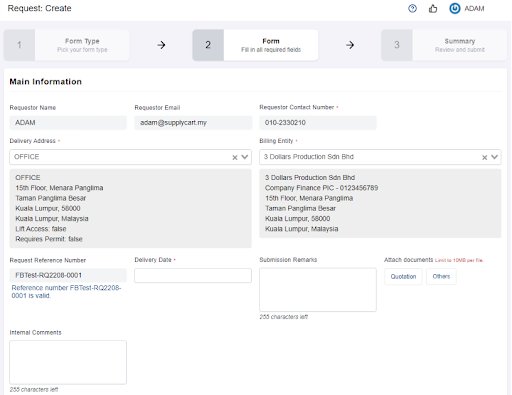
Step 4: Fill in all required fields
There are a few main sections in the form
Main Information
Vendor Information
Items/ Services Information
1. Main Information This section relates to the requestor & submitter’s details.
The submitter’s name, email & contact number would be auto-filled. However, if you are submitting on behalf of another person, you can select their name at the ‘Requestor’ section.
Delivery & Billing Address will be pre-filled to your Default addresses, but, you may change to any other entities and addresses assigned to you.
Internal comments inputted would be seen by your approvers and others with access to the ADAM PR Details page
Note: Any field with asterisk ‘ * ‘ indicates this is a required field
2. Vendor Information At this section, search or input the name of the Vendor you are raising this Requisition for
Note: * The list of vendors available are related to the Billing entity selected above. * If the vendor is not registered, it may be highlighted as ‘Unregistered’, and you may not be allowed to input the vendor’s name * You may click on the ‘Payment Terms’ field to update the payment terms for the PR by selecting from a pre-approved list. Contact your ADAM Administrator if your required Payment Term is not visible
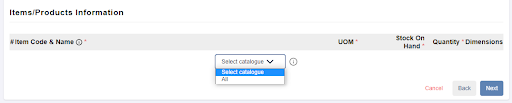
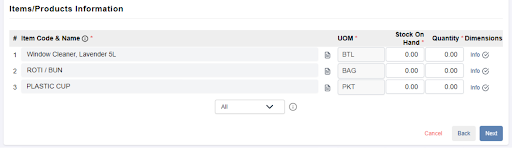
3. Items/ Products Information This section relates to the item that you would like to submit. Depending on the form setup, you can either input the item via
Free Form Text, or
Searching from a Catalogue, or
Displaying the Full Catalogue
a. Free Form Text Type to fill in the information accordingly.
b. Searchable Catalogue Products If your company has enabled searchable Catalogue Products for the form, you may type in items/products name to search for items/ products assigned to you. Click to add the into the field
Note: Requesters can only search products from a catalogue that they are assigned to. If you are unable to find a specific product, please contact your ADAM administrator.
c Full Catalogue Display If your company has enabled Catalogue Products for the form, you may click to list all items/products in the catalogue.
Note: Requesters can only select a catalogue that they are assigned to. If you are unable to find a specific catalogue, please contact your ADAM administrator.
Based on your company’s settings, you may also be required to input GL Codes, Vendor Prices & other dimensions related to individual items.
Step 5: Click ‘Next’
If the ‘Next’ button is greyed out, please recheck your form to ensure all compulsory fields are filled.
Note: Any field with asterisk ‘ * ‘ indicates a compulsory field. Any icons highlighted in Red indicate a compulsory field has not been filled up.
Step 6 : Review and click ‘Submit’ to submit
Review and confirm all information is correct before submitting.
Upon submission, you will receive an email confirming that your submission is successful and submitted for approval
Creating Purchase Requisition from a Single Request
To create a Purchase Requisition from an existing Request
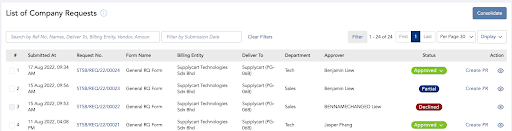
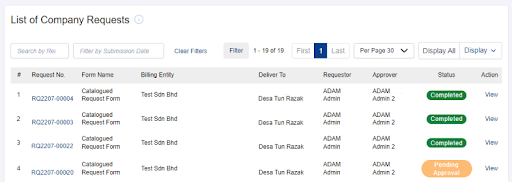
Step 1: Under ‘Request’, click ‘Company Requests’
This will allow you to access all submitted requests.
Step 2: Identify the relevant request
At this page, filter and search for the relevant Requests and click ‘Create PR’
OR You can also create Purchase Requisition from specific products by viewing the Requests details, selecting the relevant product, and clicking ‘Create PR’
Step 3: Complete the Purchase Requisition form
The Request details will be pre-filled in the Purchase Requisition form. Complete the form as per the section above
Creating Purchase Requisition from Consolidated Requests
Step 1: Under ‘Request’, click ‘Company Requests’
This will allow you to access all submitted requests.
Step 2: Identify the relevant request
At this page, filter and search for the relevant Requests
Step 3: Select & Consolidate Requests
Select the relevant ‘Approved’ Requests to consolidate and click ‘Consolidate’
Step 4: Consolidate Items
Select the items to consolidate and proceed with submitting the Purchase Requisitions form as per the section above
Actioning on Submitted Purchase Requisitions
This section will run-through how you can act on your submitted requisitions
Step 1: Under ‘Requisition’, click on ‘My Requisitions’ or ‘Company Requisitions’
My Requisitions: Showing all Requisitions submitted by you
Company Requisitions : Showing all Requisitions submitted under billing entity and/or delivery address you are assigned to.
Step 2: Search and filter submissions
You will be redirected to a page where it shows a list of requisitions that you or your organisation have submitted
Note: Use the search bar to identify specific submissions. You may refer to the placeholder text within the search bar. You may also filter submissions by using the “Filter” button. You may configure the columns visible at this page via the “Display” button
Viewing Submitted Purchase Requisitions
This section will run-through how you can view your submitted requisitions
Step 1: Search for the relevant submission as per the section above
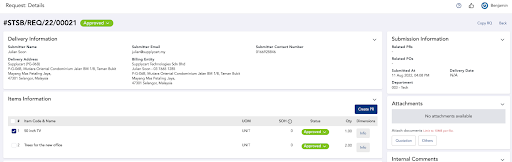
Step 2: Click ‘View’
You will be redirected to submitted request detail page
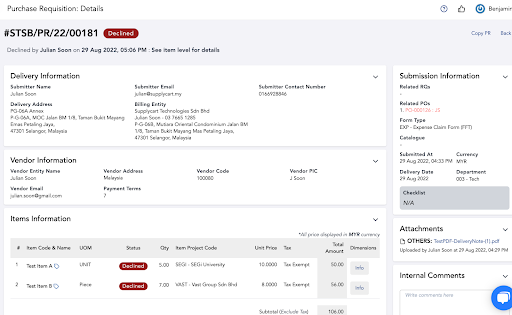
Form status definition :
New : No approval flow set up
Pending Approval : Waiting for requests to be fully approved
Incomplete : Approval flow issue
Cancelled: Requestors cancelled requests before approval
Approved: Fully approved by approvers
Closed: All actions have been completed
Processing: Part of the items are in a PO Draft
Partial: Part of the items has converted to a PO
Completed: All items has converted to a PO
Declined: Not to be actioned further
Copy Purchase Requisitions Form
This section will run-through how to copy your submitted requisition form
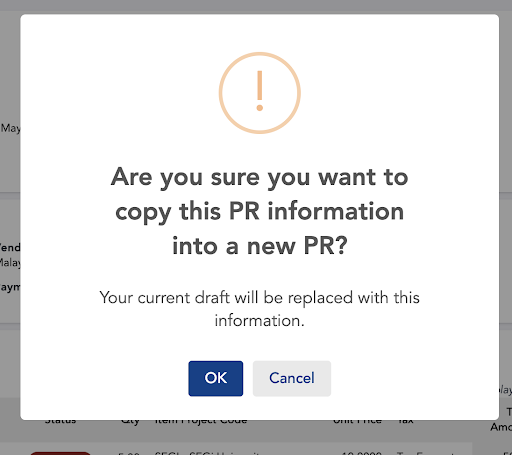
Step 1: Search for the relevant submission as per the section above
Step 2: Click ‘Copy PR’
Note: Please take note that Copy RQ will replace your current drafted request form
Step 3: Fill in all required fields
Confirm to replace any existing draft with the new Copy Purchase Requisition
Step 4: Complete the Purchase Requisition Draft
By default all details will be copied and pre-filled in your drafted form
If there are compulsory fields that are not pre-filled, you will still be required to fill in the additional details
Cancel Purchase Requisition Form
This section will run-through how to cancel your submissions
Note: Cancellation can only be done for form under ‘Pending Approval’ or ‘Pending Review’ status
Step 1: Search for the relevant submission as per the section above
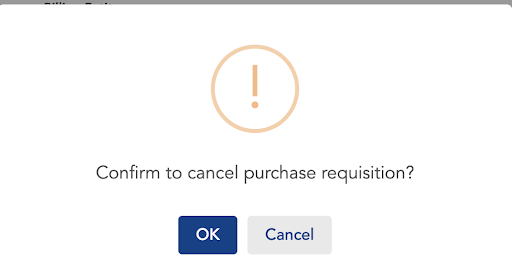
Step 2: Click ‘Cancel PR’
Click on the ‘OK’ to confirm your cancellation
If you wish to edit and resubmit your submission, please refer to ‘Copy PR Forms’ above
Note: If your request has been approved, please reach out to approver or company admin to ‘Decline’ your submission
Action on Submitted Requests Form
This section will run-through how you can act on your submitted request form
Step 1: Under ‘Request’, click on ‘My Requests’ or ‘Company Requests’
My Requests : Showing all Requests submitted by you
Company Requests : Showing all Requests submitted under billing entity and/or delivery address you are assigned to.
Step 2: Search and filter requests submitted
You will be redirected to a page where it shows a list of requests that you or your organisation have submitted.
Use the search bar to identify specific submissions. You may refer to the placeholder text within the search bar. You may also filter submissions by using the “Filter” button.
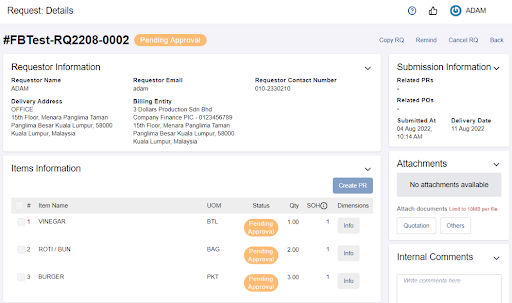
Viewing Submitted Requests Form
This section will run-through how you can view your submitted request form.
Step 1: Search for the relevant submission as per the section above.
Step 2: Click ‘View’
You will be redirected to submitted request detail page
Requests Form status definition :
New : No approval flow set up
Pending Approval : Waiting for requests to be fully approved
Incomplete : Approval flow issue
Cancelled: Requestors cancelled requests before approval
Approved: Requests fully approved
WIP: Someone updated the RQ Status
Closed: All actions have been completed
Processing: Part of the items are in PR Draft
Partial: Part of the items has converted to a PR
Completed: All items has converted to a PR
Declined: Not to be actioned further
Copy Requests Form
This section will run-through how to copy your submitted request form.
Step 1: Search for the relevant submission as per the section above.
Step 2: Click ‘Copy RQ’
Note: Please take note that Copy RQ will replace your current drafted request form
Step 3: Fill in all required fields
By default all details will be copied and pre-filled in your drafted form. If there are compulsory fields that are not pre-filled, you will still be required to fill in the additional details.
Cancel Request Form
This section will run-through how to cancel your submissions.
Note: Cancellation can only be done for form under ‘Pending Approval’ or ‘Pending Review’ status,
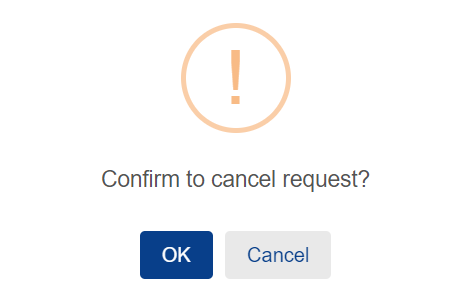
Step 1: Search for the relevant submission as per the section above.
Step 2: Click ‘Cancel RQ’
Click on the ‘OK’ to confirm your cancellation
If you wish to edit and resubmit your Request, please refer to ‘Copy Requests Form’ above.
Note: If your request has been approved, please reach out to approver or company admin to ‘Decline’ your submission
Reminding Approver(s)
This section will run-through how to remind the approver(s) to approve or review your form
Step 1: Search for the relevant submission as per the section above.
Step 2: Click ‘Remind’
This action will resend the approval email to the approver for their action.
Note: Users are only allowed to remind the approvers once a day.
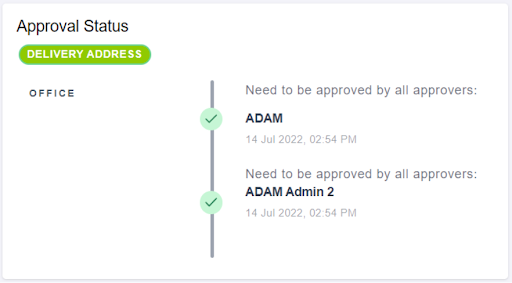
To view the approval flow for your submitted request, click ‘Approval Status’ in the purchase requisition detail page