This section will cover the creation of products to be used at the form
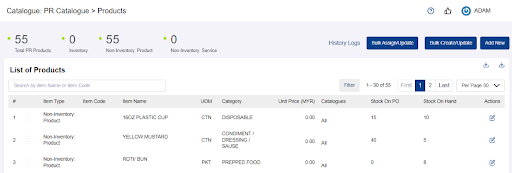
Step 1: Under ‘Catalogue’, click on ‘Products & Services’
You will be redirected to the listing page where all products created on ADAM are listed in this page. You may search by input Item Name or Item Code. Alternatively, you may also filter by catalogues assigned, product categories and item type.
Products can be created individually or by bulk upload
Method 1: Creating Individual Products
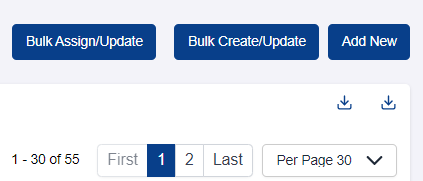
Step 1: Click on ‘Add New’
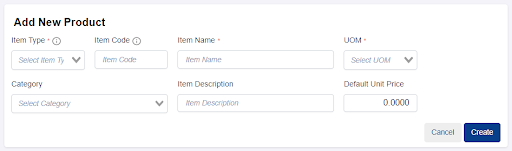
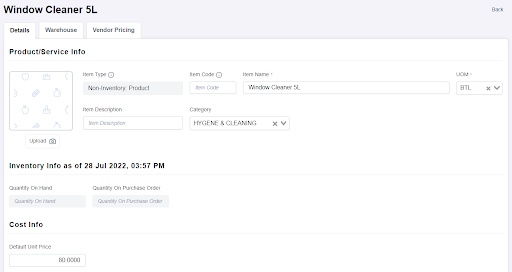
Step 2: Fill in the products details
Item Type
Item Code : This is compulsory field if Item Type is ‘Inventory’
Item Name
UOM (Unit of Measurement): More UOM can be added under Settings > Unit of Measurements
Category: More categories can be added under Settings > Categories
Item Description
Default Unit Price
Note: All compulsory fields are marked with a red asterisk (*)
Step 3: Click ‘Create’ to complete product creation
Method 2: Batch Creation of Products
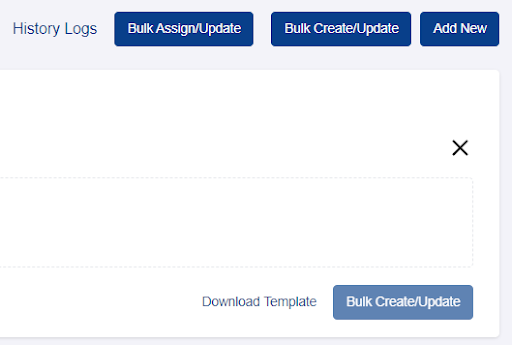
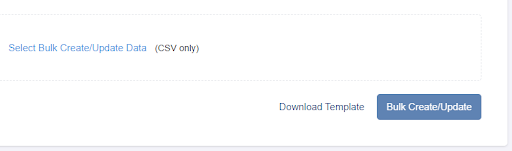
Step 1: Click ‘Bulk Create/Update’ , then click ‘Download Template’
A CSV template file will be downloaded
Step 2: Fill in the products details
Item Code : This is compulsory field if Item Type is ‘inventory’
Item Name
Item Description
Category: Input ‘Category Name’ under Settings > Categories
UOM: Input ‘UOM’ under Settings > Unit of Measurements
Unit Price
Catalogues: Input ‘Catalogue Name’ under Catalogue > PR Catalogue
Item Type : Input either ‘inventory’; ‘non-inventory-product’; ‘non-inventory-service’
Click ’Select Bulk Create/Update Data’ to upload your CSV File into ADAM. Once the file has been uploaded, click ‘Bulk Create/Update’
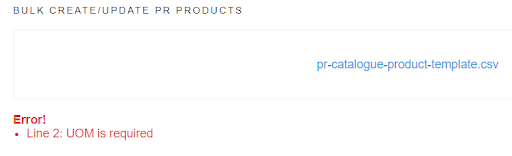
Note: If any compulsory columns are incomplete, or if the data is incorrect, the system will prompt a message highlighting the specific product line and error type.
Updating Products
This section will run-through how to update existing products
Step 1: Under ‘Catalogue’, click on ‘Products & Services'
Step 2: Select the products to update
You may search by input Item Name or Item Code. Alternatively, you may also filter by catalogues assigned, product categories and item type.
Products can be updated individually or by bulk upload
Method 1: Updating Individual Products
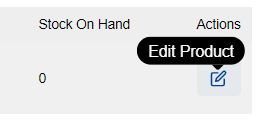
Step 1: Click ‘Edit Product’
Step 2: Replace the detail and click ‘Save’
Note: Item Type can’t be revised, please delete the product and recreate with the correct Item Type
Step 2: Update by replacing the data in downloaded CSV file
Note: The system will update product details when ‘Item Code’ is matched to any of the records in the system. If ‘Item Code’ is empty, ‘Item Name’ will be used as the reference field
Click ’Select Bulk Create/Update Data’ to upload your CSV File into ADAM. Once the file has been uploaded, click ‘Bulk Create/Update’
Note: If any compulsory columns are incomplete, or if the data is incorrect, the system will prompt a message highlighting the specific product line and error type.
Removing Products
This section will run-through how to remove existing products
Step 1: Under ‘Catalogue’, click on ‘Products & Services'
Step 2: Select the products to remove
You may search by input Item Name or Item Code. Alternatively, you may also filter by catalogues assigned, product categories and item type.
Step 3: Click ‘Edit Product’
Step 4: Click and confirm ‘Delete’
Delete button located at the bottom section of the page
Activating Vendor Pricing
This module will allow Administrators to create vendor products and mapped the products to ADAM products. The vendor products UOM, price and vendor will be prefilled when submitting a form.
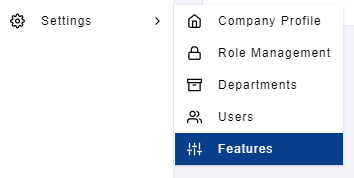
Step 1: Under ‘Settings’, click ‘Features’
Step 2: Click ‘Product Catalogue’
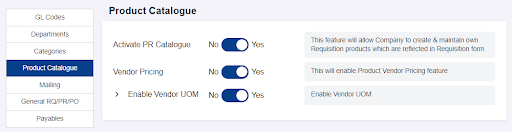
This will take you to the section where you can toggle to activate the vendor pricing and vendor UOM
Note: If vendor UOM is disabled, the vendor pricing UOM will follow product UOM
Once activated, the vendor pricing tab will appear under the product detail page.
Assigning Vendor Pricing
This section will run-through how to assign vendor pricing to a product
Step 1: Under ‘Catalogue’, click on ‘Products & Services'
Step 2: Select the products to create and assign vendor pricing
You may search by input Item Name or Item Code. Alternatively, you may also filter by catalogues assigned, product categories and item type.
Products can be updated individually or by bulk upload
Method 1: Create Vendor Pricing Individually
Step 1: Click ‘Edit Product’
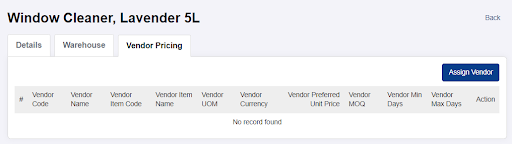
Step 2: Go to ‘Vendor Pricing’ tab
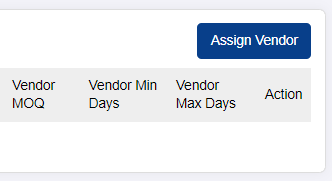
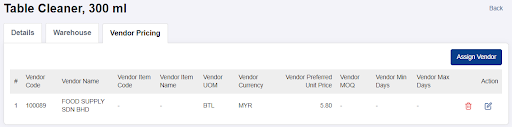
You will be redirected to the listing page where all vendor pricing previously assigned to this product are listed.
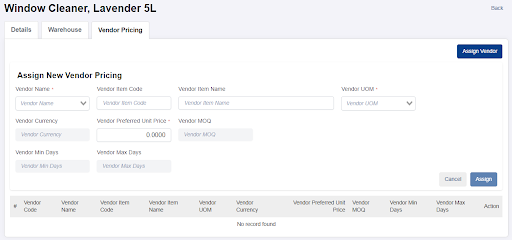
Step 3: Click ‘Assign Vendor’
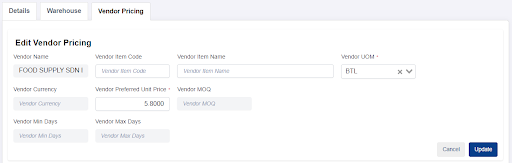
Step 4: Fill in the products details
Vendor Name : More vendors can be added under Vendors > My Vendors
Vendor Item Code :
Vendor Item Name :
Vendor UOM (Unit of Measurement): This field is only available when ‘Enable Vendor UOM’ under Settings page is activated. More UOM can be added under Settings > Unit of Measurements
Vendor Preferred Unit Price :
Note: All compulsory fields are marked with a red asterisk (*) Note: Multiple vendor pricing details are for integration and can’t be manually inputted.
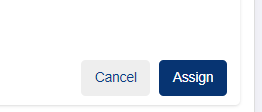
Step 5: Click ‘Assign’
Created and assigned vendor pricing will be listed. Click ‘Assign Vendor’ to add more vendor pricing.
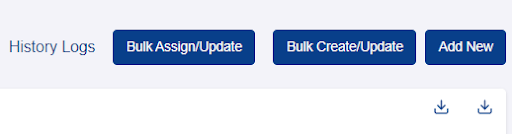
Method 2: Bulk Assign Vendor Pricing
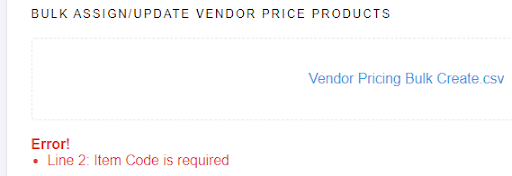
Step 1: Click ‘Bulk Assign/Update’ , then click ‘Download Template’
A CSV template file will be downloaded
Step 2: Fill in the products details
Item Code : This is compulsory field if Item Type is ‘inventory’
Item Name
Referring to the field name under Catalogue>Products & Services listing page
Note: The system will assign vendor pricing to the product details when ‘Item Code’ is matched to any of the records in the system. If ‘Item Code’ is empty, ‘Item Name’ will be used as the reference field
Vendor ID :
Vendor Name : More vendors can be added under Vendors > My Vendors
Referring to the field name under Vendors>My Vendors listing page
Vendor Item Code :
Vendor Item Name :
Vendor UOM (Unit of Measurement): This field is only available when ‘Enable Vendor UOM’ under Settings page is activated. More UOM can be added under Settings > Unit of Measurements
Click ’Select Bulk Assign/Update Data’ to upload your CSV File into ADAM. Once the file has been uploaded, click ‘Bulk Assign/Update’
Note: If any compulsory columns are incomplete, or if the data is incorrect, the system will prompt a message highlighting the specific product line and error type.
Updating Vendor Pricing
This section will run-through how to update existing vendor pricing
Step 1: Under ‘Catalogue’, click on ‘Products & Services’
Step 2: Select the products with vendor pricing to update
You may search by input Item Name or Item Code. Alternatively, you may also filter by catalogues assigned, product categories and item type.
Vendor pricing can be updated individually or by bulk upload
Method 1: Updating Individual Vendor Pricing
Step 1: Click ‘Edit Product’
Step 2: Go to ‘Vendor Pricing’ tab
You will be redirected to the listing page where all vendor pricing previously assigned to this product are listed.
Note: Only data for products with vendor pricing will be downloaded
Step 2: Update by replacing the data in downloaded CSV file
Note: The system will update product details when ‘Item Code’ is matched to any of the records in the system. If ‘Item Code’ is empty, ‘Item Name’ will be used as the reference field
Click ’Select Bulk Create/Update Data’ to upload your CSV File into ADAM. Once the file has been uploaded, click ‘Bulk Create/Update’
Note: If any compulsory columns are incomplete, or if the data is incorrect, the system will prompt a message highlighting the specific product line and error type.